Introduction
Overview
Teaching: 0 min
Exercises: 0 minQuestions
Key question (FIXME)
Objectives
First learning objective. (FIXME)
FIXME
Key Points
First key point. Brief Answer to questions. (FIXME)
Finding and downloading raw data
Overview
Teaching: 0 min
Exercises: 0 minQuestions
Key question (FIXME)
Objectives
First learning objective. (FIXME)
In this tutorial we will be looking at some published data on the binding of Gata1 and Gata2 in G1E cells (an erythroid cell line in which Gata1 is fused to an ER domain, allowing for induction of terminal erythroid differentiation using tamoxifen).
The paper with this information is Trompouki et al., published in Cell in 2011.
SRX100313
We need to download the file from the EBI direct to our server. We can do this with a programme called wget:
wget ftp://ftp.sra.ebi.ac.uk/vol1/fastq/SRR351/SRR351407/SRR351407.fastq.gz
This has downloaded one file called SRR351407.fastq.gz
Let’s try to examine the contents of the file:
head SRR351407.fastq.gz
��}��85��"U�<�3c��N@�H����ĩJX�|�O�O������3����	�~9��������m����������?�
o��������3թ>��R�I��{�������|�u]�V�ժmZoUg���MW{��qVjߵǮp+Xmt�y��qV;�j_��[U�Y
�%��9Ϊ���j�}V-Z�ű{�,$����}�R�N�k���J�Iw�`�TJ��,��:v#���*˲Uە|�7�Ux��@Ò�*˾Q�.
z�RrTe�V��,�R}y�a�]�u��*�_��R�X�Q��TS6�X�QI�l�����]V�TG�]VӐ�:r_�.�i���T�.�
鋣}e%����+�eu�.~â�����U������<�=V�����+z�^�G?��T���
We get a lot of nonsense because this is a zipped file. We can use a command called zcat to unzip these types of files and print them to the terminal. Since this file has millions of lines, we want to make sure we pipe the output to head.
zcat SRR351407.fastq.gz | head -n 12
@SRR351407.1 WICMT-SOLEXA2:3:1:1801:997/1
NNNNNNNNNNNNNNNNNNNNNNNNNNNNNNNNNNNN
+
####################################
@SRR351407.2 WICMT-SOLEXA2:3:1:2545:999/1
NNNNNNNNNNNNNNNNNNNNNNNNNNNNNNNNNNNN
+
####################################
@SRR351407.3 WICMT-SOLEXA2:3:1:3463:995/1
NNNNNNNNNNNNNNNNNNNNNNNNNNNNNNNNNNNN
+
####################################
A FASTQ file normally uses four lines per sequence.
- Line 1 begins with a ‘@’ character and is followed by the read name
- Line 2 is the raw DNA sequence
- Line 3 begins with a ‘+’ character
- Line 4 encodes the quality values for the sequence in Line 2, and must contain the same number of symbols as letters in the sequence.
So our first read is called SRR351407.1 WICMT-SOLEXA2:3:1:1801:997/1 and its sequence
is NNNNNNNNNNNNNNNNNNNNNNNNNNNNNNNNNNNN. We obtained no useful sequence information from
this read. This is quite common at the beginning of a fastq file, especially from
older Illumina machines. We need to look at some reads which are further into the file.
Peeking inside the middle of a file
Write a command that will allow us to view lines 10000-10012 of SRR351407.fastq.gz
Solution
You need to combine zcat, tail and head in a pipe to do this
zcat SRR351407.fastq.gz | head -n 10012 | tail -n 12@SRR351407.2501 WICMT-SOLEXA2:3:1:7736:1233/1 ACACCTTTTCCTGCAGGGACATCGTCTGCCACCGAC + GGGEGGEDEDGGGGG>3?5AG@GGDGGEGD8BAAAD @SRR351407.2502 WICMT-SOLEXA2:3:1:7847:1231/1 GTCACTGCCACTGTTGGCCAGGATGCACACACACAC + IIIIIIIIIIIIIIGIIIIFIIEIIEEGEG@IGGGG @SRR351407.2503 WICMT-SOLEXA2:3:1:7925:1234/1 GGAGGCAAACCTGACCTGCCTTCCCTGTAACGGTGG + GIIIIIIHIIIIIIIIIIIIIIIIIIIHIIFIIDID
These fastq files are big, and will take a long time to process. To
be able to complete this tutorial in a reasonable amount of time, we
can download some data files which have had most of the reads removed,
leaving only those that map to chromosome 11. We use wget for this,
and then unzip the files using a program called tar.
wget https://rob.beagrie.com/media/chip-tutorial/chip-tutorial-files.tar.gz
tar zxvf chip-tutorial-files.tar.gz
cd chip-tutorial
ls fastqs
G1E_ATAC_0h_r1A_end1.chr11.fastq.gz  G1E_ATAC_30h_r1_end1.chr11.fastq.gz
G1E_ATAC_0h_r1A_end2.chr11.fastq.gz  G1E_ATAC_30h_r1_end2.chr11.fastq.gz
G1E_ATAC_0h_r1B_end1.chr11.fastq.gz  G1E_ATAC_30h_r2_end1.chr11.fastq.gz
G1E_ATAC_0h_r1B_end2.chr11.fastq.gz  G1E_ATAC_30h_r2_end2.chr11.fastq.gz
G1E_ATAC_0h_r1_end1.chr11.fastq.gz   SRR351406.chr11.fastq.gz
G1E_ATAC_0h_r1_end2.chr11.fastq.gz   SRR351407.chr11.fastq.gz
G1E_ATAC_0h_r2_end1.chr11.fastq.gz   SRR351409.chr11.fastq.gz
G1E_ATAC_0h_r2_end2.chr11.fastq.gz   SRR351410.chr11.fastq.gz
Our example data contains some ATAC-seq data files, which have
sensible names. We’ve also downloaded four files from
Trompouki et al. which are named using their ID
from GEO. It’s going to be difficlut to remember what these cells are.
We could rename them, but then we might forget which file relates to
which piece of published data. One solution here is to make a symbolic
link using ln -s
cd fastqs
ln -s SRR351406.chr11.fastq.gz G1E_ChIP_Input_0h.chr11.fastq.gz
ln -s SRR351407.chr11.fastq.gz G1E_ChIP_Gata2_0h.chr11.fastq.gz
zcat G1E_ChIP_Input_0h.chr11.fastq.gz | head
Linking files
Make symbolic links to name the two remaining files from the G1E paper following the same convention.
Solution
SRR351409 and SRR351410 are the input and the Gata1 ChIP from G1ER cells treated for 24h with estradiol. So a sensible name would look something like this:
ln -s SRR351409.chr11.fastq.gz G1E_ChIP_Input_24h.chr11.fastq.gz
ln -s SRR351410.chr11.fastq.gz G1E_ChIP_Gata1_24h.chr11.fastq.gz
Key Points
First key point. Brief Answer to questions. (FIXME)
Aligning data to a genome
Overview
Teaching: 0 min
Exercises: 0 minQuestions
Key question (FIXME)
Objectives
First learning objective. (FIXME)
We now need to figure out where these reads came from in the
mouse genome. There are a class of programs specially designed
for this task, generally called “aligners”. The one we will be
using for this tutorial is bowtie2. On the cluster, we need
to specify which version of bowtie2 we want to use before
we can start aligning our reads. To see the list of available
versions, we can use module avail
Once bowtie2 is loaded, we can then view its help page to give us an idea what to do next.
module avail
module load bowtie2/2.3.5
bowtie2 --help
Bowtie 2 version 2.3.5 by Ben Langmead (langmea@cs.jhu.edu, www.cs.jhu.edu/~langmea)
Usage:
  bowtie2 [options]* -x <bt2-idx> {-1 <m1> -2 <m2> | -U <r> | --interleaved <i> | --sra-acc <acc>} [-S <sam>]

  <bt2-idx>  Index filename prefix (minus trailing .X.bt2).
             NOTE: Bowtie 1 and Bowtie 2 indexes are not compatible.
  <m1>       Files with #1 mates, paired with files in <m2>.
             Could be gzip'ed (extension: .gz) or bzip2'ed (extension: .bz2).
  <m2>       Files with #2 mates, paired with files in <m1>.
             Could be gzip'ed (extension: .gz) or bzip2'ed (extension: .bz2).
  <r>        Files with unpaired reads.
             Could be gzip'ed (extension: .gz) or bzip2'ed (extension: .bz2).
  <i>        Files with interleaved paired-end FASTQ/FASTA reads
             Could be gzip'ed (extension: .gz) or bzip2'ed (extension: .bz2).
  <acc>      Files are SRA accessions. Accessions not found in local storage will
             be fetched from NCBI.
  <sam>      File for SAM output (default: stdout)

  <m1>, <m2>, <r> can be comma-separated lists (no whitespace) and can be
  specified many times.  E.g. '-U file1.fq,file2.fq -U file3.fq'.
The first thing we need to provide bowtie is an index. Normally, we would use an index that covers the whole mouse genome. For this tutorial, we can use an index that only covers mouse chromosome 11. This will make bowtie2 run more quickly and use less memory.
ls bowtie2-index-mm10-chr11
genome.1.bt2  genome.2.bt2  genome.3.bt2
genome.4.bt2  genome.rev.1.bt2  genome.rev.2.bt2
The other thing we need to provide to bowtie is a fastq file to map.
The files downloaded from Trompouki et al. are “unpaired”
or “single-end” reads, so we need to use the -u flag.
bowtie2 -x bowtie2-index-mm10-chr11/genome -U fastqs/G1E_ChIP_Gata1_24h.chr11.fastq.gz | head -n 4
@HD	VN:1.0	SO:unsorted
@SQ	SN:chr11	LN:122082543
@PG	ID:bowtie2	PN:bowtie2	VN:2.3.5	CL:"/package/bowtie2/2.3.5/bin/bowtie2-align-s --wrapper basic-0 -x bowtie2-index-mm10-chr11/genome -U fastqs/G1E_ChIP_Gata1_24h.chr11.fastq.gz"
SRR351410.24963042	16	chr11	3102483	0	36M	*	0	0	GCATTTCACATTATTCACGTTTTTCACTGTTTCTCG	FFFFFFFFFFFGGEGGGGGGFGGGGGGFGGGGFGFG	AS:i:-10	XS:i:-10	XN:i:0	XM:i:2	XO:i:0	XG:i:0	NM:i:2	MD:Z:1T10T23	YT:Z:UU
The first three lines start with @ - these are the header lines that give information about the command that was used to generate the file and the index that was used for the mapping.
The last line is a single alignment of a read agains the genome. This information is given in SAM format:
| Col | Field Type | Brief description | First read of our file |
|---|---|---|---|
| 1 QNAME | String | Query template NAME | SRR351410.24963042 |
| 2 FLAG | Int | bitwise FLAG | 16 |
| 3 RNAME | String | Reference sequence NAME | chr11 |
| 4 POS | Int | 1-based leftmost mapping POSition | 3102483 |
| 5 MAPQ | Int | MAPping Quality | 0 |
| 6 CIGAR | String | CIGAR string | 36M |
| 7 RNEXT | String | Reference name of the mate/next read | * |
| 8 PNEXT | Int | Position of the mate/next read | 0 |
| 9 TLEN | Int | observed Template LENgth | 0 |
| 10 SEQ | String | segment SEQuence | GCATTTCACATTATTCACGTTTTTCACTGTTTCTCG |
| 11 QUAL | String | ASCII of Phred-scaled base QUALity+33 | FFFFFFFFFFFGGEGGGGGGFGGGGGGFGGGGFGFG |
Let’s have a look at another of our files:
bowtie2 -x bowtie2-index-mm10-chr11/genome -U fastqs/G1E_ChIP_Gata2_0h.chr11.fastq.gz | head -n 4
@HD	VN:1.0	SO:unsorted
@SQ	SN:chr11	LN:122082543
@PG	ID:bowtie2	PN:bowtie2	VN:2.3.5	CL:"/package/bowtie2/2.3.5/bin/bowtie2-align-s --wrapper basic-0 -x bowtie2-index-mm10-chr11/genome -U fastqs/G1E_ChIP_Gata2_0h.chr11.fastq.gz"
SRR351406.214265	16	chr11	3099998	0	12M1I23M	*	0	0	TCCAGGTCTTACGGTGTGTATTTCACATTTTTCACG	DGGDGG<GGEDDGGGGGBG8GGGG<GGGGGGGGGGG	AS:i:-21	XN:i:3	XM:i:5	XO:i:1	XG:i:1	NM:i:6	MD:Z:0N0N0N5C3T22	YT:Z:UU
Note the different CIGAR string: “12M1I23M” indicating that our read had one base more than the reference genome at position 13.
We’re going to need to save these alignments for future use:
mkdir aligned_reads
bowtie2 -x bowtie2-index-mm10-chr11/genome -U fastqs/G1E_ChIP_Gata2_0h.chr11.fastq.gz > aligned_reads/G1E_ChIP_Gata2_0h.chr11.sam
ls -l -h fastqs/SRR351407.chr11.fastq.gz aligned_reads/G1E_ChIP_Gata2_0h.chr11.sam
-rw-r--r-- 1 user group 98M Apr 30 17:21 aligned_reads/G1E_ChIP_Gata2_0h.chr11.sam
-rw-r--r-- 1 user group  15M Apr 28 10:43 fastqs/SRR351407.chr11.fastq.gz
We’ve generated a sam file with all the alignments, but it’s huge! It’s around
6x larger than the fastq file. This is because the fastq is compressed but the sam
file isn’t. Generally, people store alignments in bam files rather than sam
files. These are essentially just a compressed version of a sam. We can create a
bam file from a sam file using samtools.
module load samtools/1.9
samtools view -b aligned_reads/G1E_ChIP_Gata2_0h.chr11.sam > aligned_reads/G1E_ChIP_Gata2_0h.chr11.bam
ls -l -h aligned_reads/G1E_ChIP_Gata2_0h.chr11.sam aligned_reads/G1E_ChIP_Gata2_0h.chr11.bam
-rw-r--r-- 1 user group  20M May  1 09:42 aligned_reads/G1E_ChIP_Gata2_0h.chr11.bam
-rw-r--r-- 1 user group 98M May  1 09:41 aligned_reads/G1E_ChIP_Gata2_0h.chr11.sam
That’s better, the bam file is only slightly larger than the fastq. We can do this in a single command so that we don’t need to generate the intermediate sam file.
rm aligned_reads/*
bowtie2 -x bowtie2-index-mm10-chr11/genome -U fastqs/G1E_ChIP_Gata2_0h.chr11.fastq.gz | samtools view -b > aligned_reads/G1E_ChIP_Gata2_0h.chr11.bam
ls -l -h aligned_reads
-rw-r--r-- 1 user group 20M May 1 09:42 aligned_reads/G1E_ChIP_Gata2_0h.chr11.bam
Mapping files in a for loop
Using the command we just ran, write a for loop that will align all the files matching the pattern fastqs/G1E_ChIP_*.fastq.gz
Hint: You will need to generate the bam files in fastqs/ and then move them to aligned_reads/
Solution
for fastq in fastqs/G1E_ChIP_*.fastq.gz;
do
   bowtie2 -x bowtie2-index-mm10-chr11/genome -U $fastq | samtools view -b > $fastq.bam
   mv $fastq.bam aligned_reads/
done
or, without the move command:
cd fastqs
for fastq in G1E_ChIP_*.fastq.gz;
do
   bowtie2 -x ../bowtie2-index-mm10-chr11/genome -U $fastq | samtools view -b > ../aligned_reads/$(echo $fastq | cut -f 1,2 -d '.').bam
done
What about the ATAC-seq files? These are paired end data, so there are two files for each dataset.
zcat fastqs/G1E_ATAC_0h_rep1_end1.chr11.fastq.gz | head -n 4
@NB501183:592:HN75MBGX9:1:11101:1153:3424/1
TCTTCACTCTCCCTCTCTTCCGGATTCTCTTTAGGCCTTG
+
AAAAAEAEEEEEEEAEEAE/EEEEEEEEEEEEEE/EAEEE
zcat fastqs/G1E_ATAC_0h_rep1_end2.chr11.fastq.gz | head -n 4
@NB501183:592:HN75MBGX9:1:11101:1153:3424/2
CACAAGGCCGAGAGCCCAGCCCGCAAGAAAGGCCCACGC
+
AAAAAAEEEEEEEE<E<<EE/EEEEEEEEEEEE<<AEEE
Note how the read name is the same, except that in the
end1 file the read name ends in /1 whereas in the
end2 file it ends in /2. These are the two “mates” or
“pairs” for this read.
To map these reads using bowtie we need to use the -1 and
-2 flags.
bowtie2 -x bowtie2-index-mm10-chr11/genome -1 fastqs/G1E_ATAC_0h_rep1_end1.chr11.fastq.gz -2 fastqs/G1E_ATAC_0h_rep1_end2.chr11.fastq.gz | samtools view -b > aligned_reads/G1E_ATAC_0h_rep1.bam
What if we have more than one file for each experiment?
This is a common situation, especially with Illumina NextSeq machines
which give you four files for each sample. bowtie2 needs us to give
these as a comma-separated list.
bowtie2 -x bowtie2-index-mm10-chr11/genome -1 fastqs/G1E_ATAC_0h_rep2A_end1.chr11.fastq.gz,fastqs/G1E_ATAC_0h_rep2B_end1.chr11.fastq.gz -2 fastqs/G1E_ATAC_0h_rep2A_end2.chr11.fastq.gz,fastqs/G1E_ATAC_0h_rep2B_end2.chr11.fastq.gz | samtools view -b > aligned_reads/G1E_ATAC_0h_rep2.bam
Finish mapping the files
Make bam files of aligned reads for the rest of the atac-seq fastqs
Solution
bowtie2 -x bowtie2-index-mm10-chr11/genome -1 fastqs/G1E_ATAC_30h_rep1_end1.chr11.fastq.gz -2 fastqs/G1E_ATAC_30h_rep1_end2.chr11.fastq.gz | samtools view -b > aligned_reads/G1E_ATAC_30h_rep1.bam
bowtie2 -x bowtie2-index-mm10-chr11/genome -1 fastqs/G1E_ATAC_30h_rep2_end1.chr11.fastq.gz -2 fastqs/G1E_ATAC_30h_rep2_end2.chr11.fastq.gz | samtools view -b > aligned_reads/G1E_ATAC_30h_rep2.bam
Mapping paired end files in a loop
If we wanted to map the paired end files in a loop, the first thing to do would be to write a for loop that printed the correct reads and the correct bam file. Fill in the blanks to make the right loop:
for timepoint in ___
do
  for replicate in rep1 rep2
  ___
    echo READS=fastqs/G1E_ATAC_${timepoint}____ fastqs/G1E_ATAC_${timepoint}____
    echo BAM=___
  done
done
Expected output:
READS=fastqs/G1E_ATAC_0h_rep1_end1.chr11.fastq.gz fastqs/G1E_ATAC_0h_rep1_end2.chr11.fastq.gz
BAM=aligned_reads/G1E_ATAC_0h_rep1.chr11.bam
READS=fastqs/G1E_ATAC_0h_rep2_end1.chr11.fastq.gz fastqs/G1E_ATAC_0h_rep2_end2.chr11.fastq.gz
BAM=aligned_reads/G1E_ATAC_0h_rep2.chr11.bam
READS=fastqs/G1E_ATAC_30h_rep1_end1.chr11.fastq.gz fastqs/G1E_ATAC_30h_rep1_end2.chr11.fastq.gz
BAM=aligned_reads/G1E_ATAC_30h_rep1.chr11.bam
READS=fastqs/G1E_ATAC_30h_rep2_end1.chr11.fastq.gz fastqs/G1E_ATAC_30h_rep2_end2.chr11.fastq.gz
BAM=aligned_reads/G1E_ATAC_30h_rep2.chr11.bam
Solution
for timepoint in 0h 30h
do
  for replicate in rep1 rep2
  do
    echo READS=fastqs/G1E_ATAC_${timepoint}_${replicate}_end1.chr11.fastq.gz fastqs/G1E_ATAC_${timepoint}_${replicate}_end2.chr11.fastq.gz
    echo BAM=aligned_reads/G1E_ATAC_${timepoint}_${replicate}.chr11.bam
  done
done
Key Points
First key point. Brief Answer to questions. (FIXME)
Visualising aligned reads
Overview
Teaching: 0 min
Exercises: 0 minQuestions
Key question (FIXME)
Objectives
First learning objective. (FIXME)
To make sure we’re all working with the same set of files, lets download some bam files and overwrite the ones we made in the last lesson:
cd ..
rm -rf chip-tutorial/aligned_reads
wget https://rob.beagrie.com/media/chip-tutorial/chip-tutorial-files2.tar.gz
tar zxvf chip-tutorial-files2.tar.gz
ls -l chip-tutorial/aligned_reads
-rw-r--r-- 1 user group  84893348 May  5 15:27 G1E_ATAC_0h_rep1.chr11.bam
-rw-r--r-- 1 user group 104745615 May  5 15:27 G1E_ATAC_0h_rep2.chr11.bam
-rw-r--r-- 1 user group 104157142 May  5 15:27 G1E_ATAC_30h_rep1.chr11.bam
-rw-r--r-- 1 user group   9254482 May  5 15:27 G1E_ATAC_30h_rep2.chr11.bam
-rw-r--r-- 1 user group  48952433 May  5 15:27 G1E_ChIP_Gata1_24h.chr11.bam
-rw-r--r-- 1 user group  20428179 May  5 15:27 G1E_ChIP_Gata2_0h.chr11.bam
-rw-r--r-- 1 user group  47261386 May  5 15:27 G1E_ChIP_Input_0h.chr11.bam
-rw-r--r-- 1 user group  37927946 May  5 15:27 G1E_ChIP_Input_24h.chr11.bam
We now need to make a new file that tells us how many reads there are mapping to any given genomic position. One very common type of such file is a BigWig. We can make these using a set of software called deeptools, which we need to load on the cluster just as we did for bowtie2:
module avail
module load deeptools/3.0.1
bamCoverage --help
We can get a detailed description of the options on the bamCoverage help page.
The command we’ll want to use to map our ChIP and ATAC-seq files is:
bamCoverage -b aligned_reads/G1E_ATAC_0h_rep1.bam --binSize 1 --blackListFileName annotation/mm10-blacklist.ENCSR636HFF.v2.bed --normalizeUsing RPKM --extendReads -o bigwigs/G1E_ATAC_0h_rep1.bw
'aligned_reads/G1E_ATAC_0h_rep1.bam' does not appear to have an index. You MUST index the file first!
Deeptools requires an index file. We can generate one of these with samtools index
samtools index aligned_reads/G1E_ATAC_0h_rep1.bam
[E::hts_idx_push] unsorted positions
samtools index: "aligned_reads/G1E_ATAC_0h_rep1.bam" is corrupted or unsorted
We get another error, this time because samtools index only works on a file where
the reads are sorted by their chromosomal position. We can sort the files using
samtools sort
samtools sort aligned_reads/G1E_ATAC_0h_rep1.bam > aligned_reads/G1E_ATAC_0h_rep1.sorted.bam
samtools index aligned_reads/G1E_ATAC_0h_rep1.sorted.bam
ls -lh aligned_reads/
-rw-r--r-- 1 user group  81M May  4 17:06 G1E_ATAC_0h_rep1.bam
-rw-r--r-- 1 user group  75M May  5 10:15 G1E_ATAC_0h_rep1.sorted.bam
-rw-r--r-- 1 user group  95K May  5 10:17 G1E_ATAC_0h_rep1.sorted.bam.bai
-rw-r--r-- 1 user group 100M May  4 16:58 G1E_ATAC_0h_rep2.bam
-rw-r--r-- 1 user group 100M May  4 17:11 G1E_ATAC_30h_rep1.bam
-rw-r--r-- 1 user group 8.9M May  4 17:12 G1E_ATAC_30h_rep2.bam
-rw-r--r-- 1 user group  47M May  4 16:43 G1E_ChIP_Gata1_24h.chr11.bam
-rw-r--r-- 1 user group  20M May  4 16:44 G1E_ChIP_Gata2_0h.chr11.bam
-rw-r--r-- 1 user group  46M May  4 16:45 G1E_ChIP_Input_0h.chr11.bam
-rw-r--r-- 1 user group  37M May  4 16:46 G1E_ChIP_Input_24h.chr11.bam
Now that we have sorted and indexed our bam file, we can finally run bamCoverage:
bamCoverage -b aligned_reads/G1E_ATAC_0h_rep1.sorted.bam --binSize 1 \
--blackListFileName annotation/mm10-blacklist.ENCSR636HFF.v2.bed \
--normalizeUsing RPKM --extendReads -o bigwigs/G1E_ATAC_0h_rep1.bw -r chr11:32180000-32345000
ls -l bigwigs/
Sorting and indexing files in a loop (part 1)
Write a pattern to match just the unsorted .bam files
ls -l _______Expected output:
-rw-r--r-- 1 user group  84893348 May  4 17:06 aligned_reads/G1E_ATAC_0h_rep1.chr11.bam
-rw-r--r-- 1 user group 104745615 May  4 16:58 aligned_reads/G1E_ATAC_0h_rep2.chr11.bam
-rw-r--r-- 1 user group 104157142 May  4 17:11 aligned_reads/G1E_ATAC_30h_rep1.chr11.bam
-rw-r--r-- 1 user group   9254482 May  4 17:12 aligned_reads/G1E_ATAC_30h_rep2.chr11.bam
-rw-r--r-- 1 user group  48952433 May  4 16:43 aligned_reads/G1E_ChIP_Gata1_24h.chr11.bam
-rw-r--r-- 1 user group  20428179 May  4 16:44 aligned_reads/G1E_ChIP_Gata2_0h.chr11.bam
-rw-r--r-- 1 user group  47261386 May  4 16:45 aligned_reads/G1E_ChIP_Input_0h.chr11.bam
-rw-r--r-- 1 user group  37927946 May  4 16:46 aligned_reads/G1E_ChIP_Input_24h.chr11.bam
Solution
ls -l aligned_reads/G1E_*.chr11.bam
Sorting and indexing files in a loop (part 2)
Use the pattern you just wrote to write a loop that uses the
cutcommand to print out the name of the bam file without the “.bam” part.for bamfile in <PATTERN FROM PART 1> do echo $bamfile echo $bamfile | cut -d ____ -f ____ doneExpected output:
aligned_reads/G1E_ATAC_0h_rep1.chr11.bam
aligned_reads/G1E_ATAC_0h_rep1.chr11
aligned_reads/G1E_ATAC_0h_rep2.chr11.bam
aligned_reads/G1E_ATAC_0h_rep2.chr11
aligned_reads/G1E_ATAC_30h_rep1.chr11.bam
aligned_reads/G1E_ATAC_30h_rep1.chr11
aligned_reads/G1E_ATAC_30h_rep2.chr11.bam
aligned_reads/G1E_ATAC_30h_rep2.chr11
aligned_reads/G1E_ChIP_Gata1_24h.chr11.bam
aligned_reads/G1E_ChIP_Gata1_24h.chr11
aligned_reads/G1E_ChIP_Gata2_0h.chr11.bam
aligned_reads/G1E_ChIP_Gata2_0h.chr11
aligned_reads/G1E_ChIP_Input_0h.chr11.bam
aligned_reads/G1E_ChIP_Input_0h.chr11
aligned_reads/G1E_ChIP_Input_24h.chr11.bam
aligned_reads/G1E_ChIP_Input_24h.chr11
Solution
for bamfile in aligned_reads/G1E_*.chr11.bam
do
  echo $bamfile
  echo $bamfile | cut -d "." -f 1,2
done
Sorting and indexing files in a loop (part 3)
Using your answers to parts 1 & 2 and the “command substitution” syntax
$()we learned in the [shell find lesson][shell-find] to print the original bam file and its corresponding sorted bam file.for bamfile in <PATTERN FROM PART 1> do echo $bamfile $(echo $bamfile | cut -d ____ -f ____).sorted.bam doneExpected output:
aligned_reads/G1E_ATAC_0h_rep1.chr11.bam aligned_reads/G1E_ATAC_0h_rep1.chr11.sorted.bam
aligned_reads/G1E_ATAC_0h_rep2.chr11.bam aligned_reads/G1E_ATAC_0h_rep2.chr11.sorted.bam
aligned_reads/G1E_ATAC_30h_rep1.chr11.bam aligned_reads/G1E_ATAC_30h_rep1.chr11.sorted.bam
aligned_reads/G1E_ATAC_30h_rep2.chr11.bam aligned_reads/G1E_ATAC_30h_rep2.chr11.sorted.bam
aligned_reads/G1E_ChIP_Gata1_24h.chr11.bam aligned_reads/G1E_ChIP_Gata1_24h.chr11.sorted.bam
aligned_reads/G1E_ChIP_Gata2_0h.chr11.bam aligned_reads/G1E_ChIP_Gata2_0h.chr11.sorted.bam
aligned_reads/G1E_ChIP_Input_0h.chr11.bam aligned_reads/G1E_ChIP_Input_0h.chr11.sorted.bam
aligned_reads/G1E_ChIP_Input_24h.chr11.bam aligned_reads/G1E_ChIP_Input_24h.chr11.sorted.bam
Solution
for bamfile in aligned_reads/G1E_*.chr11.bam
do
  echo $bamfile $(echo $bamfile | cut -d "." -f 1,2).sorted.bam
done
Sorting and indexing files in a loop (part 4)
Using your answers to parts 1, 2 & 3 write a for loop that sorts and indexes all of the bam files.
for ______________
do
  samtools sort ___________
  samtools index __________
done
Solution
for bamfile in aligned_reads/G1E_*.chr11.bam
do
  samtools sort $bamfile > $(echo $bamfile | cut -d "." -f 1,2).sorted.bam
  samtools index $(echo $bamfile | cut -d "." -f 1,2).sorted.bam
done
And since we’ve now sorted and indexed all our bam files, we should be able to make bigwigs for them all using a for loop:
for bam in aligned_reads/G1E_*.sorted.bam
do
  bamCoverage -b $bam --binSize 1 --blackListFileName annotation/mm10-blacklist.ENCSR636HFF.v2.bed \
  --normalizeUsing RPKM --extendReads -o $(echo $bam | cut -d "." -f 1,2).bw -r chr11:32180000-32345000
  mv $(echo $bam | cut -d "." -f 1,2).bw bigwigs/
done
*ERROR*: library is not paired-end. Please provide an extension length.
mv: cannot stat `aligned_reads/G1E_ChIP_Gata2_0h.chr11.bw': No such file or directory
We get an error message because the ChIP samples are not paired end, so we can’t automatically extend the fragments, we have to give an estimated fragment size:
for bam in aligned_reads/G1E_ChIP*.sorted.bam
do
  bamCoverage -b $bam --binSize 1 --blackListFileName annotation/mm10-blacklist.ENCSR636HFF.v2.bed \
  --normalizeUsing RPKM --extendReads 150 -o $(echo $bam | cut -d "." -f 1,2).bw -r chr11:32180000-32345000
  mv $(echo $bam | cut -d "." -f 1,2).bw bigwigs/
done
ls -l bigwigs/
-rw-r--r-- 1 user group 24116 May  5 15:01 G1E_ATAC_0h_rep1.chr11.bw
-rw-r--r-- 1 user group 28656 May  5 15:02 G1E_ATAC_0h_rep2.chr11.bw
-rw-r--r-- 1 user group 28260 May  5 15:02 G1E_ATAC_30h_rep1.chr11.bw
-rw-r--r-- 1 user group  4031 May  5 15:02 G1E_ATAC_30h_rep2.chr11.bw
-rw-r--r-- 1 user group 38176 May  5 15:07 G1E_ChIP_Gata1_24h.chr11.bw
-rw-r--r-- 1 user group 24922 May  5 15:07 G1E_ChIP_Gata2_0h.chr11.bw
-rw-r--r-- 1 user group 33703 May  5 15:07 G1E_ChIP_Input_0h.chr11.bw
-rw-r--r-- 1 user group 27264 May  5 15:08 G1E_ChIP_Input_24h.chr11.bw
Key Points
First key point. Brief Answer to questions. (FIXME)
Working with cluster queuing systems
Overview
Teaching: 0 min
Exercises: 0 minQuestions
Key question (FIXME)
Objectives
First learning objective. (FIXME)
Supercomputers are actually a collection of many smaller computers loosely tied together, this is why they are often referred to as clusters. When we ssh in to the cluster, we are actually logging in to a specific computer in the cluster called a login node. These computers are designed to communicate from the cluster to the outside world, but they are not designed for doing intensive computation. There are separate computers called compute nodes which are used for running jobs.
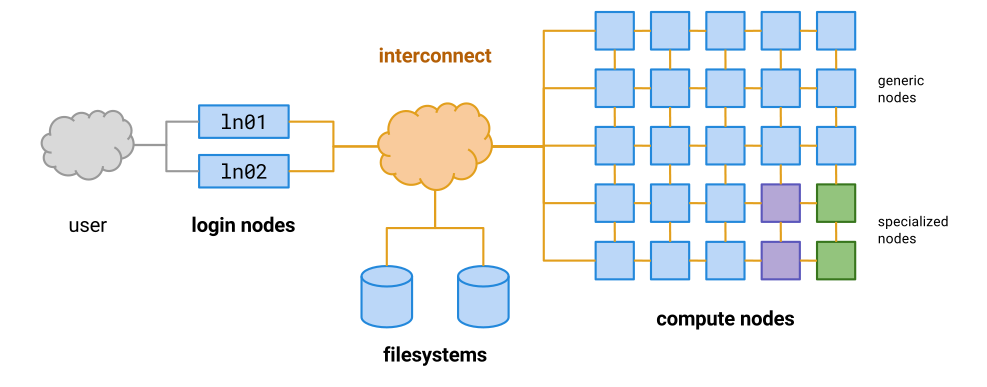
Instead of doing our work directly on the login node, as we have been doing in the previous lessons, we should instead write scripts that contain the commands we want to run, and then use the cluster’s queueing system to allocate those commands to a free computer within the cluster (a compute node).
Let’s test this out by writing a very simple script.
nano test-qsub.sh
Add the following commands to your new script:
hostname
whoami
pwd
This script should print the following information:
- The name of the computer it is running on
- The name of the user that is running it
- The current working directory
Let’s test it out on the login node by asking bash to run it for us:
bash test-qsub.sh
deva
username
/home/username/chip-tutorial/
Hopefully the output should be what you expected. Let’s now submit the script to the cluster and ask
it to allocate these commands to a free compute node. We can do this using qsub.
qsub test-qsub.sh
Your job 3490362 ("test-qsub.sh") has been submitted
While our job is running, we can check its status using qstat:
qstat
The output is a long list of every job that’s running on the system, which can be a little difficult
to navigate. To make things easier, we can use grep to search specifically for our own jobs.
qstat | grep username
Once our job has finished, we need to find the output. Let’s check our current directory:
ls -l
drwxr-xr-x 2 user group 24 May  6 15:33 aligned_reads
drwxr-xr-x 2 user group  2 May  5 15:25 annotation
drwxr-xr-x 2 user group  8 May 11 11:49 bigwigs
drwxr-xr-x 2 user group  6 Apr 29 13:53 bowtie2-index-mm10-chr11
drwxr-xr-x 2 user group 19 May  4 15:56 fastqs
-rw-r--r-- 1 user group 20 May 12 09:37 test-qsub.sh
There are no new files there. Instead, the output has been saved in our home directory in a file that starts with the same name as our script:
ls -l ~/test-qsub.sh*
-rw-r--r-- 1 user group  0 May 12 09:37 /home/group/user/test-qsub.sh.e3490361
-rw-r--r-- 1 user group 50 May 12 09:37 /home/group/user/test-qsub.sh.o3490361
Let’s open the output file (.o) and see the contents.
cat ~/test-qsub.sh.o3490361
cbrgbigmem01p
user
/home/user
The first line shows that these commands were not run on the login node, although they were run using our user account. They also weren’t run in the directory of the script, but rather in our home directory. We almost always want our jobs to run in the directory of the script file, but we need a way to explicitly tell the cluster this is what we want. We can add it as an option to our script file:
nano test-qsub.sh
#$ -cwd

hostname
whoami
pwd
Now let’s submit the job again:
qsub test-qsub.sh
Your job 3490362 ("test-qsub.sh") has been submitted
qstat | grep username
ls -l
drwxr-xr-x 2 user group 24 May  6 15:33 aligned_reads
drwxr-xr-x 2 user group  2 May  5 15:25 annotation
drwxr-xr-x 2 user group  8 May 11 11:49 bigwigs
drwxr-xr-x 2 user group  6 Apr 29 13:53 bowtie2-index-mm10-chr11
drwxr-xr-x 2 user group 19 May  4 15:56 fastqs
-rw-r--r-- 1 user group 29 May 12 10:14 test-qsub.sh
-rw-r--r-- 1 user group  0 May 12 10:14 test-qsub.sh.e3490364
-rw-r--r-- 1 user group 57 May 12 10:14 test-qsub.sh.o3490364
This time the output has been saved in our current directory. Let’s check the output file:
cat test_qsub.sh.o3490364
cbrgwn006p
user
/home/user/chip-tutorial
The script ran on a different compute node this time (maybe it didn’t for you), and it ran in the folder where the script is, which is much more convenient.
Other qsub script parameters
There are many other parameters for scripts that you are going to submit via qsub that you might find useful. These should all be on new lines that start with #$
-o /different/output/file: Save script output to this file-e /different/error/file: Save script error messages to this file-N job_nameGive your job a different name to find it easier in qsub-m eaSend an email when the job finishes-l h_vmem=20GAsk the queue to allocate more memory for the job (this may be necessary for mapping jobs)So for example a typical script might start like this:
#$ -cwd
#$ -o job_output.txt
#$ -e job_errors.txt
#$ -N job_name
#$ -m ea
Making bigwigs using the cluster queue
In the last session we made bigwig files that covered around 100kb of chromosome 11, because making them for the whole chromosome would have taken too long. Now we can write a script to make the full bigwigs and submit it to the cluster using qsub.
Make a script called
make_bigwigs.shand edit it so that it makes all eight bigwigs.HINT: Think about why we need two for loops for this, rather than just one?
HINT: This script uses the
basenamecommand, which we haven’t met before. Try it out in the terminal to figure out what it does.#$ -cwd #$ -m ea module load deeptools/3.0.1 for bam in aligned_reads/G1E_ATAC*.sorted.bam do bamCoverage ____ -o bigwigs/$(basename $bam | cut -d "." -f 1,2).bw -r chr11 done for bam in aligned_reads/G1E_ChIP*.sorted.bam do bamCoverage ____ -o bigwigs/$(basename $bam | cut -d "." -f 1,2).bw -r chr11 doneSolution
#$ -cwd
#$ -m ea

module load deeptools/3.0.1

for bam in aligned_reads/G1E_ATAC*.sorted.bam
do
 bamCoverage -b $bam --binSize 1 \
 --blackListFileName annotation/mm10-blacklist.ENCSR636HFF.v2.bed \
 --normalizeUsing RPKM --extendReads -o bigwigs/$(basename $bam | cut -d "." -f 1,2).bw -r chr11
done

for bam in aligned_reads/G1E_ChIP*.sorted.bam
do
 bamCoverage -b $bam --binSize 1 \
 --blackListFileName annotation/mm10-blacklist.ENCSR636HFF.v2.bed \
 --normalizeUsing RPKM --extendReads 150 -o bigwigs/$(basename $bam | cut -d "." -f 1,2).bw -r chr11
done
If we want to run a few short commands using the cluster, we can also use qlogin instead of qsub
Key Points
First key point. Brief Answer to questions. (FIXME)
Peak calling with MACS2
Overview
Teaching: 0 min
Exercises: 0 minQuestions
Key question (FIXME)
Objectives
First learning objective. (FIXME)
For this lesson we’re doing to do some peak calling using some software called macs2. Let’s keep using the best practices we learned in the last lesson and run these commands on a “compute node” rather than the “login node”.
qlogin
module load macs2/2.1.2
macs2 callpeak --help
Let’s map the ChIP samples first. We need to make an output directory for the files, then run macs2
with the -t, -c -n, -f, -g, -q and --outdir parameters
mkdir peak_calls
mkdir peak_calls/macs2
macs2 callpeak -t aligned_reads/G1E_ChIP_Gata2_0h.chr11.sorted.bam \
-c aligned_reads/G1E_ChIP_Input_0h.chr11.sorted.bam -n G1E_ChIP_Gata2_0h \
-f BAM -g 1.87e9 -q 0.1 --outdir peak_calls/macs2
ls -l peak_calls/macs2
Once macs2 has finished running, we should have four new files in our output directory.
-rw-r--r-- 1 user group  88633 May 12 12:06 G1E_ChIP_Gata2_0h_model.r
-rw-r--r-- 1 user group 135241 May 12 12:06 G1E_ChIP_Gata2_0h_peaks.narrowPeak
-rw-r--r-- 1 user group 151285 May 12 12:06 G1E_ChIP_Gata2_0h_peaks.xls
-rw-r--r-- 1 user group  93538 May 12 12:06 G1E_ChIP_Gata2_0h_summits.bed
We can see that the “.narrowPeak” file is in BED format with a few extra columns. You can read about this file format at UCSC.
head peak_calls/macs2/G1E_ChIP_Gata2_0h_peaks.narrowPeak
chr11	3104926	3105658	G1E_ChIP_Gata2_0h_peak_1	998	.	11.03180	103.14955	99.81662	416
chr11	3105932	3106226	G1E_ChIP_Gata2_0h_peak_2	61	.	3.02292	8.60469	6.17999	159
chr11	3201865	3202318	G1E_ChIP_Gata2_0h_peak_3	105	.	3.96565	13.13776	10.59181	374
chr11	3279535	3280209	G1E_ChIP_Gata2_0h_peak_4	628	.	16.61709	65.97417	62.87525	400
chr11	3291562	3291949	G1E_ChIP_Gata2_0h_peak_5	102	.	4.20686	12.83781	10.29883	159
chr11	3313151	3313768	G1E_ChIP_Gata2_0h_peak_6	1158	.	24.21939	119.31017	115.88039	324
chr11	3379576	3379870	G1E_ChIP_Gata2_0h_peak_7	55	.	5.12864	7.99220	5.58688	90
chr11	3434737	3435288	G1E_ChIP_Gata2_0h_peak_8	175	.	9.95468	20.25646	17.57889	272
chr11	3446439	3446733	G1E_ChIP_Gata2_0h_peak_9	46	.	4.69043	6.99010	4.62133	264
chr11	4086358	4086652	G1E_ChIP_Gata2_0h_peak_10	49	.	4.89368	7.31591	4.93340	69
macs2 callpeak -t aligned_reads/G1E_ChIP_Gata1_24h.chr11.sorted.bam \
-c aligned_reads/G1E_ChIP_Input_24h.chr11.sorted.bam -n G1E_ChIP_Gata1_24h \
-f BAM -g 1.87e9 -q 0.1 --outdir peak_calls/macs2
wc -l peak_calls/macs2/*.narrowPeak
   9 peak_calls/macs2/G1E_ChIP_Gata1_24h_peaks.narrowPeak
1548 peak_calls/macs2/G1E_ChIP_Gata2_0h_peaks.narrowPeak
1557 total
The Gata1 file has only 9 peaks. We should examine them somehow to see what’s going on.
We can upload them to the UCSC genome browser, but first we need to download them to our
local computer, which we can do using scp. We need the absolute path to the file
we need to download, which we can get using a combination of ls and pwd.
Once we have the absolute path, we can open another terminal and download the files like this:
scp username@cluster.com:/home/user/chip-tutorial/peak_calls/macs2/*.narrowPeak Downloads/
Then we copy and paste the data into UCSC. Open the genome browser and go to “add custom tracks”. We need to paste our data into the text box, with a track line first. For Gata1, this might look like:
track type=narrowPeak name="Gata1-ChIP" description="ChIP for Gata1 in 24h induced G1E cells"
We can see the reason macs2 hasn’t called many peaks for Gata1 is that it looks very similar to the control, input track (i.e. it’s not a very good ChIP).
Now we can peak call the ATAC-seq datasets. We need to make two changes to the command for these samples because there’s no control track and because they are paired end files.
macs2 callpeak -t aligned_reads/G1E_ATAC_0h_rep1.chr11.sorted.bam \
-n G1E_ATAC_0h_rep1 -f BAMPE -g 1.87e9 -q 0.1 --outdir peak_calls/macs2
Let’s write a batch script to peak call all of the ATAC-seq files. First log out of the compute node using Ctrl+D
Peak calling the rest of the ATAC-seq files.
Open a new bash script called
peak_call_atac.shand use the template below to write a script for submission to the cluster that will peak call all of the ATAC-seq files.#$ -cwd #$ -m ea for ____ do macs2 callpeak ____ -n $(basename $bam | cut -d "." -f 1) doneSolution
#$ -cwd
#$ -m ea

for bam in aligned_reads/G1E_ATAC_*.sorted.bam
do
 macs2 callpeak -t $bam -n $(basename $bam | cut -d "." -f 1) \
 -f BAMPE -g 1.87e9 -q 0.1 --outdir peak_calls/macs2
done
Key Points
First key point. Brief Answer to questions. (FIXME)
Finding overlapping peaks
Overview
Teaching: 0 min
Exercises: 0 minQuestions
Key question (FIXME)
Objectives
First learning objective. (FIXME)
For this session, we’re going to be using bedtools. We need to load it in to our shell first:
module load bedtools/2.27.1
bedtools intersect --help
You should use the peak files ending in “.narrowPeak” for the following challenges.
Getting peak calls
If you didn’t manage to finish peak calling all of the files from lesson 6, you can download some pre-computed peak calls and use those instead
cd chip-tutorial
wget https://rob.beagrie.com/media/chip-tutorial/peak_calls.tar.gz
tar zxvf peak_calls.tar.gz
ls peak_calls/macs2/*.narrowPeak
peak_calls/macs2/G1E_ATAC_0h_rep1_peaks.narrowPeak peak_calls/macs2/G1E_ATAC_0h_rep2_peaks.narrowPeak peak_calls/macs2/G1E_ATAC_30h_rep1_peaks.narrowPeak peak_calls/macs2/G1E_ATAC_30h_rep2_peaks.narrowPeak peak_calls/macs2/G1E_ChIP_Gata1_24h_peaks.narrowPeak peak_calls/macs2/G1E_ChIP_Gata2_0h_peaks.narrowPeak
Challenge 1: How many overlapping peaks are there?
Use
bedtools intersectto work out how many peaks overlap between replicates 1 and 2 of the ATAC-seq data from 0h (uninduced) G1E cells. You can usebedtools intersect --help, the bedtools online help page and google for help.Solution
bedtools intersect -u -a peak_calls/macs2/G1E_ATAC_0h_rep1_peaks.narrowPeak \
-b peak_calls/macs2/G1E_ATAC_0h_rep2_peaks.narrowPeak | wc -l
Challenge 2: How many overlapping peaks are there (part 2)?
Write a nested for loop (i.e. two for loops, one within the other) to count the number of overlapping peaks between every possible combination of the peak files from the ATAC-seq samples.
HINT: Remember to build your loop commands up slowly, starting from the smallest possible piece of code and slowly adding things on.
Solution
for bed1 in peak_calls/macs2/G1E_ATAC_*.narrowPeak
do
  for bed2 in peak_calls/macs2/G1E_ATAC_*.narrowPeak
  do
    echo $(basename $bed1) $(basename $bed2) $(bedtools intersect -u -a $bed1 -b $bed2 | wc -l)
  done
done
Challenge 3: How many overlapping peaks are there (part 3)?
Hopefully you’ve found out that there is quite a lot of overlap between our peak calls. But how many distinct peaks did we call in total? We can find out using bedtools merge. You will also need to use
bedtools sortHINT: It might be easier to make an intermediate file at each step, but you can also do this as a single command in a pipeline.
Solution
cat peak_calls/macs2/G1E_ATAC_*.narrowPeak | bedtools sort | bedtools merge | wc -l
Challenge 4: Making a list of consensus ATAC-seq peaks
We know how many distinct peaks we had in total, but we probably don’t want to trust those that were only identified in a single replicate. We need to get bedtools merge to retain information about which peaks were merged together. If you look in one of the narrowPeak files you will see that column 4 is potentially helpful here:
head peak_calls/macs2/G1E_ATAC_0h_rep1_peaks.narrowPeakchr11 3104874 3105821 G1E_ATAC_0h_rep1_peak_1 291 . 9.47788 32.42815 29.18559 557 chr11 3112182 3112345 G1E_ATAC_0h_rep1_peak_2 12 . 3.02204 3.25904 1.28949 109 chr11 3123275 3124132 G1E_ATAC_0h_rep1_peak_3 829 . 15.12556 89.32738 82.92233 600 chr11 3138607 3138829 G1E_ATAC_0h_rep1_peak_4 210 . 13.28701 24.07859 21.09448 101 chr11 3152358 3152962 G1E_ATAC_0h_rep1_peak_5 119 . 3.50204 14.67430 11.98344 234 chr11 3153981 3154339 G1E_ATAC_0h_rep1_peak_6 51 . 2.45218 7.50518 5.10658 125 chr11 3155042 3156271 G1E_ATAC_0h_rep1_peak_7 63 . 2.62152 8.83316 6.37181 1001 chr11 3156443 3156962 G1E_ATAC_0h_rep1_peak_8 127 . 3.28824 15.49932 12.78019 131 chr11 3157227 3157683 G1E_ATAC_0h_rep1_peak_9 55 . 2.46292 7.97198 5.55084 26 chr11 3157856 3158101 G1E_ATAC_0h_rep1_peak_10 41 . 2.35471 6.49318 4.14949 90Read the bedtools merge documentation and figure out how to report all the distinct values of column 4 from the peaks that were merged, and the number of distinct values that were merged (‘distinct’ values and ‘count_distinct’). Make sure to save the results in a file with the merged peak calls.
Solution
cat peak_calls/macs2/G1E_ATAC_*.narrowPeak | bedtools sort | bedtools merge -c 4,4 -o \
distinct,count_distinct > peak_calls/macs2/G1E_ATAC_all_merged.bed
BONUS: the command
cat peak_calls/macs2/G1E_ATAC_*.narrowPeak | sed 's/_peak_/\t/'will split column 4 into two colums, so that the new column 4 contains only the name of the sample the peak was found in and the new column 5 contains a unique identifier for each peak from that file. Why would this be helpful to add to your pipeline?
Challenge 5: Making a list of consensus ATAC-seq peaks (part 2)
As long as the number of peaks that were merged together is the last column in your file,
grep "1$"will give you a list of peaks that were only found in one replicate (this works because the $ symbol indicates the end of a line, so grep will only find lines that end with a 1 as the last character). How can you modify this to find peaks that were found in more than one replicate and save them to a new file?Solution
grep -v "1$" peak_calls/macs2/G1E_ATAC_all_merged.bed > \
peak_calls/macs2/G1E_ATAC_all_reproducible.bed
BONUS: This command wouldn’t work if you were merging peaks from more than ten input files. Why? It also doesn’t allow you to increase the threshold of the minimum number of samples a peak needs to be found in to be considered a real peak. One alternative approach would be to import the peaks file as a pandas Dataframe using Python, and to write a python script that would filter peaks in a more sophisticated manner. You can have a go at this if you have some extra time.
Challenge 6: How big are our peaks?
Now that we have a list of consensus peaks, we can start thinking about doing an analysis to look for differential accessibility. In order to do this, we need a table telling us how many reads mapped to each peak (rows) in each sample (columns). Read the help page for bedtools multicov to work out how to generate this table.
Solution
bedtools multicov -bed peak_calls/macs2/G1E_ATAC_all_reproducible.bed \
-bams aligned_reads/G1E_ATAC_0h_rep1.chr11.sorted.bam \
aligned_reads/G1E_ATAC_0h_rep2.chr11.sorted.bam \
aligned_reads/G1E_ATAC_30h_rep1.chr11.sorted.bam \
aligned_reads/G1E_ATAC_30h_rep2.chr11.sorted.bam > \
peak_counts_by_sample.table
We don’t want to write
-bams aligned_reads/G1E_ATAC_*.sorted.bambecause then we won’t know what order the columns were in for downstream analysis. In fact it would be even better if this new table had a header line so we can remember which column was which:bams=$(echo aligned_reads/G1E_ATAC_*.sorted.bam) echo "chrom start stop samples n_samples $bams" > peak_counts_by_sample.table bedtools multicov -bed peak_calls/macs2/G1E_ATAC_all_reproducible.bed \ -bams $bams >> peak_counts_by_sample.tableBONUS: Now that we have a table of peak heights for each sample, we can see how similar our biological replicates are. Open the table in Python as a pandas dataframe and make scatter plots to compare the samples. Are biological replicates more similar to one another than to the other time point (i.e. is 0h rep1 more similar to 0h rep2 or 30h rep1)?
Key Points
First key point. Brief Answer to questions. (FIXME)
Calling differential accessibility using DESeq2
Overview
Teaching: 0 min
Exercises: 0 minQuestions
Key question (FIXME)
Objectives
First learning objective. (FIXME)
We’re going to use DESeq2 on our local machines, so first we need to download the peaks file from
the previous lesson using scp and the absolute path of the file.
ls $(pwd)/peak_counts_by_sample.table
/home/user/chip-tutorial/peak_counts_by_sample.table
scp user@cluster:/home/user/chip-tutorial/peak_counts_by_sample.table .
mkdir peak_calls
mkdir peak_calls/macs2
macs2 callpeak -t aligned_reads/G1E_ChIP_Gata2_0h.chr11.sorted.bam \
-c aligned_reads/G1E_ChIP_Input_0h.chr11.sorted.bam -n G1E_ChIP_Gata2_0h \
-f BAM -g 1.87e9 -q 0.1 --outdir peak_calls/macs2
ls -l peak_calls/macs2
Once macs2 has finished running, we should have four new files in our output directory.
-rw-r--r-- 1 user group  88633 May 12 12:06 G1E_ChIP_Gata2_0h_model.r
-rw-r--r-- 1 user group 135241 May 12 12:06 G1E_ChIP_Gata2_0h_peaks.narrowPeak
-rw-r--r-- 1 user group 151285 May 12 12:06 G1E_ChIP_Gata2_0h_peaks.xls
-rw-r--r-- 1 user group  93538 May 12 12:06 G1E_ChIP_Gata2_0h_summits.bed
We can see that the “.narrowPeak” file is in BED format with a few extra columns. You can read about this file format at UCSC.
head peak_calls/macs2/G1E_ChIP_Gata2_0h_peaks.narrowPeak
chr11	3104926	3105658	G1E_ChIP_Gata2_0h_peak_1	998	.	11.03180	103.14955	99.81662	416
chr11	3105932	3106226	G1E_ChIP_Gata2_0h_peak_2	61	.	3.02292	8.60469	6.17999	159
chr11	3201865	3202318	G1E_ChIP_Gata2_0h_peak_3	105	.	3.96565	13.13776	10.59181	374
chr11	3279535	3280209	G1E_ChIP_Gata2_0h_peak_4	628	.	16.61709	65.97417	62.87525	400
chr11	3291562	3291949	G1E_ChIP_Gata2_0h_peak_5	102	.	4.20686	12.83781	10.29883	159
chr11	3313151	3313768	G1E_ChIP_Gata2_0h_peak_6	1158	.	24.21939	119.31017	115.88039	324
chr11	3379576	3379870	G1E_ChIP_Gata2_0h_peak_7	55	.	5.12864	7.99220	5.58688	90
chr11	3434737	3435288	G1E_ChIP_Gata2_0h_peak_8	175	.	9.95468	20.25646	17.57889	272
chr11	3446439	3446733	G1E_ChIP_Gata2_0h_peak_9	46	.	4.69043	6.99010	4.62133	264
chr11	4086358	4086652	G1E_ChIP_Gata2_0h_peak_10	49	.	4.89368	7.31591	4.93340	69
macs2 callpeak -t aligned_reads/G1E_ChIP_Gata1_24h.chr11.sorted.bam \
-c aligned_reads/G1E_ChIP_Input_24h.chr11.sorted.bam -n G1E_ChIP_Gata1_24h \
-f BAM -g 1.87e9 -q 0.1 --outdir peak_calls/macs2
wc -l peak_calls/macs2/*.narrowPeak
   9 peak_calls/macs2/G1E_ChIP_Gata1_24h_peaks.narrowPeak
1548 peak_calls/macs2/G1E_ChIP_Gata2_0h_peaks.narrowPeak
1557 total
The Gata1 file has only 9 peaks. We should examine them somehow to see what’s going on.
We can upload them to the UCSC genome browser, but first we need to download them to our
local computer, which we can do using scp. We need the absolute path to the file
we need to download, which we can get using a combination of ls and pwd.
Once we have the absolute path, we can open another terminal and download the files like this:
scp username@cluster.com:/home/user/chip-tutorial/peak_calls/macs2/*.narrowPeak Downloads/
Then we copy and paste the data into UCSC. Open the genome browser and go to “add custom tracks”. We need to paste our data into the text box, with a track line first. For Gata1, this might look like:
track type=narrowPeak name="Gata1-ChIP" description="ChIP for Gata1 in 24h induced G1E cells"
We can see the reason macs2 hasn’t called many peaks for Gata1 is that it looks very similar to the control, input track (i.e. it’s not a very good ChIP).
Now we can peak call the ATAC-seq datasets. We need to make two changes to the command for these samples because there’s no control track and because they are paired end files.
macs2 callpeak -t aligned_reads/G1E_ATAC_0h_rep1.chr11.sorted.bam \
-n G1E_ATAC_0h_rep1 -f BAMPE -g 1.87e9 -q 0.1 --outdir peak_calls/macs2
Let’s write a batch script to peak call all of the ATAC-seq files. First log out of the compute node using Ctrl+D
Peak calling the rest of the ATAC-seq files.
Open a new bash script called
peak_call_atac.shand use the template below to write a script for submission to the cluster that will peak call all of the ATAC-seq files.#$ -cwd #$ -m ea for ____ do macs2 callpeak ____ -n $(basename $bam | cut -d "." -f 1) doneSolution
#$ -cwd
#$ -m ea

for bam in aligned_reads/G1E_ATAC_*.sorted.bam
do
 macs2 callpeak -t $bam -n $(basename $bam | cut -d "." -f 1) \
 -f BAMPE -g 1.87e9 -q 0.1 --outdir peak_calls/macs2
done
Key Points
First key point. Brief Answer to questions. (FIXME)
Motif analysis
Overview
Teaching: 0 min
Exercises: 0 minQuestions
Key question (FIXME)
Objectives
First learning objective. (FIXME)
Looking for occurrences of known motifs
In this session, we will examine how to find motifs in our called peaks.
The first thing we need to do is to upload the peaks that we called with DESeq2 back to the cluster.
Do this using scp from your local machine:
scp Downloads/peaks_significantly_down_at_30h.bed user@cluster:~/chip-tutorial/
scp Downloads/peaks_significantly_up_at_30h.bed user@cluster:~/chip-tutorial/
In order to find motifs in these peaks, we first need their sequences. We can fetch these using
bedtools :
cd chip-tutorial
mkdir motif_analysis
module load bedtools/2.27.1
bedtools getfasta -fi /path/to/fasta_file -bed peaks_significantly_up_at_30h.bed > \
motif_analysis/peaks_significantly_up_at_30h.fa
head -n 2 motif_analysis/peaks_significantly_up_at_30h.fa
>chr11:3648419-3649280
ggcccggaagcaaacccagatcttccgactccGGAGCTCGAATCCCCACCCCGGAGCTGCCGCCAGCGCTCTCGCTCCCCACTAAGGTGGCATAAGTAGGAAAAGGCAAAGGAGGAAGCCCACCACCAACCATCCTCCAGCTCCCTCTTGACCCTCCAACTGGGTCCTAGCAGGCCCCGAGGGGTGGCGCCAGGCCTCCAGGCCAGCCCCGGCCACCCCAGCTTCCCCCGCCGCCTCCCCGGGAGCGGGGCGGAGTTGCCCGCCGCCGCCAACCACCCGGACGACCCCTCGTCGGATCGCAAAAGCATAGGCCGCCGCCCGAGTTCTGCGTACGAGAAGAAAGACGCGGCGCGAGCGCCAACGGCCAccgggcgcgcgccgcggcggccgggcctgcgccccAAGAGCTGGATGCCAGAGCAGGAGAAAGAGCCGCCAACCGATCGCTCGATCGACCGCACGCCCGCTCCTTCGCCCTACCAGACCGGGGAGGGGGGGAGGGCGCGCCAGGGCTTCTTCGAGTTAGGGGCCTGACTCCCCGGCGACAAGACAAGATGGCTCCTCCGCTCTGCTCTGCAGCTACCGTCCCGGCTGCGTCTCTCGGCCCGCCCCCGGTACTGTTCCTTTAAATGGCCGAGAGGGGTCAGGAAAGCAGGAAGAGAGGCGCGCGCCCTCACGTGATGGGGGCGGACCGGCCAAACAAGATCCGGTCACGTGGACCGACGTCGCTCGCCAATCAGAAGGTGGAGTCTCAGGGCGGGGGCGGGAAGACTTCGAGCTCTGTGATTGGCCGAAGGTGCGCTGGAGGCCTCGGCGGCCGGGCCGTCGGGAGTGAGCGAGGTGATTCGCGCTGCGTGCGCT
Challenge: Fetching peak sequences
Now make a file containing the sequences of the peaks that had lower accessibility at 30h.
Solution
bedtools getfasta -fi /path/to/fasta_file -bed peaks_significantly_down_at_30h.bed > \
motif_analysis/peaks_significantly_down_at_30h.fa
We have the peak sequences, so now we need a motif to search for. Go to the hocomoco motif database and search for Gata1 (make sure to select the mouse database). We’re presented with two options, a short core motif and a longer motif with the Tal1 upstream site, so click on the shorter motif, then scroll down to find the download link for the pcm file and right click to copy the link address.
Once you have the address, you can download the motif file directly to the cluster using wget:
cd motif_analysis
wget https://hocomoco11.autosome.ru/final_bundle/hocomoco11/full/MOUSE/mono/pcm/GATA1_MOUSE.H11MO.1.A.pcm
We’re going to use fimo to search for Gata1 motif occurrences in our peaks, but fimo requires a
slightly different format for the motif file. Luckily it comes with a conversion utility we can use
to create the right sort of motif file. Fimo is part of the meme suite, so we need to find an
appropriate module to load (for some reason meme version 5 and above don’t seem to come with motif
conversion tools, so look for a module for meme v4).
module avail
module load meme/4.9.1_1
chen2meme GATA1_MOUSE.H11MO.1.A.pcm > GATA1_MOUSE.H11MO.1.A.meme
Now that we have a motif file, we can use it with fimo:
fimo -o gata1_up_peaks GATA1_MOUSE.H11MO.1.A.meme peaks_significantly_up_at_30h.fa
ls -l gata1_up_peaks
-rw-r--r-- 1 user group   265 May 19 09:13 cisml.css
-rw-r--r-- 1 user group 32511 May 19 09:13 cisml.xml
-rw-r--r-- 1 user group  6531 May 19 09:13 fimo.gff
-rw-r--r-- 1 user group 19520 May 19 09:13 fimo.html
-rw-r--r-- 1 user group 14261 May 19 09:13 fimo-to-html.xsl
-rw-r--r-- 1 user group  3634 May 19 09:13 fimo.txt
-rw-r--r-- 1 user group  1598 May 19 09:13 fimo.xml
You can have a look at these files to see if you can figure out what information they contain. For now, let’s examine gata1_up_peaks/fimo.gff:
head -n5 gata1_up_peaks/fimo.gff
##gff-version 3
chr11:101732559-101733190	fimo	nucleotide_motif	58	68	51.0	+	.	Name=GATA1_MOUSE.H11MO.1.A;ID=GATA1_MOUSE.H11MO.1.A-1;pvalue=8e-06;qvalue=0.366;sequence=ACAGATAAGCA
chr11:102363673-102363981	fimo	nucleotide_motif	82	92	42.6	+	.	Name=GATA1_MOUSE.H11MO.1.A;ID=GATA1_MOUSE.H11MO.1.A-2;pvalue=5.53e-05;qvalue=0.704;sequence=CCTGATAAGAG
chr11:102363673-102363981	fimo	nucleotide_motif	167	177	56.6	+	.	Name=GATA1_MOUSE.H11MO.1.A;ID=GATA1_MOUSE.H11MO.1.A-1;pvalue=2.17e-06;qvalue=0.198;sequence=ACAGATAAGGG
chr11:103412015-103413050	fimo	nucleotide_motif	250	260	49.3	+	.	Name=GATA1_MOUSE.H11MO.1.A;ID=GATA1_MOUSE.H11MO.1.A-1;pvalue=1.18e-05;qvalue=0.394;sequence=TGAGATAAGAG
The first line is a header, then each subsequent line of this gff file is a match to a Gata1 motif that fimo found.
Challenge: Counting motif occurrances
Use fimo to look for Gata1 motifs in the peaks with decreased accessibility. Is there a difference in the frequency of Gata1 motifs between the “up” peaks and the “down” peaks? or the “down” peaks
Solution
fimo -o gata1_down_peaks GATA1_MOUSE.H11MO.1.A.meme peaks_significantly_down.fa
wc -l gata1_*_peaks/fimo.gff
190 gata1_down_peaks/fimo.gff 40 gata1_up_peaks/fimo.gff 230 totalInterestingly, there are a lot more Gata1 motifs in the peaks that decrease in accessibility than those which increase in accessibility, even though there are similar numbers of peaks in each list.
De novo motif analysis
If we don’t know what motifs we want to look for, we can do a de novo motif analysis that tries to generate motifs which are enriched in a set of peaks and then match those back to known transcription factors. The package we use for this is called meme chip, which we’ve already loaded as part of the meme suite.
qlogin
module load meme/5.0.1
meme-chip -o motif_analysis/meme_up_peaks -db /path/to/meme_database \
motif_analysis/peaks_significantly_up_at_30h.fa
To look through the results, we’ll need to download the whole folder to our local machine. We can do
that with scp -r:
scp -r user@cluster:/home/user/chip-tutorial/motif_analysis/meme_up_peaks .
cd meme_up_peaks
open meme.html
Key Points
First key point. Brief Answer to questions. (FIXME)